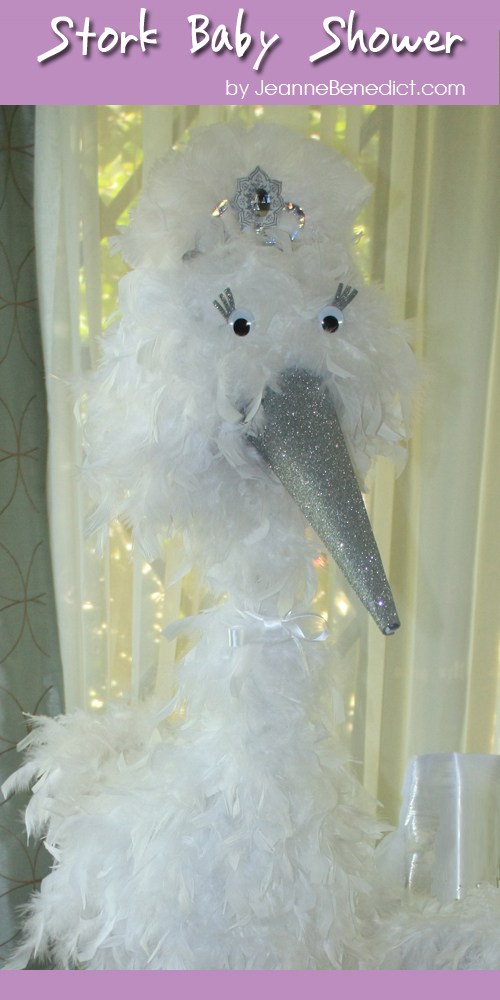
Years ago, I made this DIY Boa Stork at a Women’s Expo and the crowd just loved it! So I’ve expanded the theme into a fabulous Stork Baby Shower with the menu, recipes, and more decor ideas to follow in subsequent posts. The stork stands about 5 feet high and can be used at an indoor or outdoor baby shower. Actually, it’s easier to make him stand outside as you just stick his legs into the ground. There’s something about women and boas that’s a magical combo at a party. Whenever I demo a craft or decoration with boas, the oohs and ahs are plenty. I think it’s the frivolity, floozy, and free spirit in all of us that comes out whether one is wearing a boa or surrounded by the feathery adornment that’s both decadent and fun. This decoration is easy to make. Just follow my step-by-step pictorial guide below!
Materials
2 (6-inch diameter) Styrofoam balls
1 (@8-inch long) Styrofoam cone
2 (3-foot long x 1/2-inch diameter) bamboo sticks painted silver
1 (2-foot long x 1/2-inch diameter) wood dowel or bamboo stick
1 (8-inch long) wood dowel
6 – 8 feather boas (about 6-feet long)
greening pins
3 silver glittery craft foam sheet (8 1/2 x 11 inches)
2 googly eyes
3-D super-strength glue dots (I like the Thermo-web brand)
doublestick tape
1 feather crown or tiara
white ribbon
Steps:
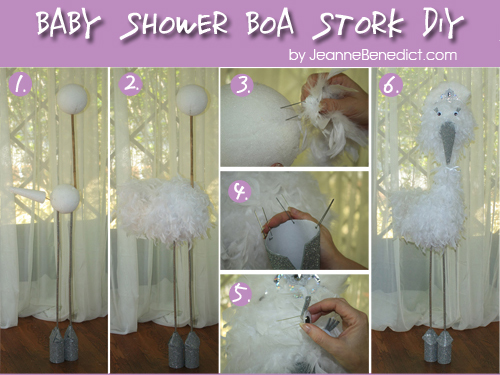
1. First, you’ll need to put together the base of the stork. Insert the 2 (3-foot long x 1/2-inch diameter) silver bamboo sticks into a Styrofoam ball as the stork’s legs and body. Insert the 1 (2-foot long x 1/2-inch diameter) wood dowel or bamboo stick into the top of Styrofoam ball body with the legs on the bottom to make the stork’s neck. Stick the other Styrofoam ball on top of the dowel as his head. To make his tail section, insert the 8-inch dowel into the bottom of the Styrofoam cone and then insert the other end of the dowel into the Styrofoam ball that is the stork’s body.
To make him stand inside: I filled 2 empty soup cans with rock salt and inserted the legs into each one. Then, I wrapped a silver glittery foam sheet around each can to mask it. I picked up the foam sheets at Michael’s Arts and Crafts Store (got all my supplies there!) and the sheets have adhesive on the back which is great! You’ll also need to bend down the top corners of the sheet and use glue dots or hot glue to keep them down; you just want it to look aesthetically pleasing, and make sure he can stand nice and study!
To make him stand outside: Stick his legs into the ground.
2. Beginning at the tail or Styrofoam cone, wrap boas around his body, up his neck, and around his head to mask the base underneath.
3. Use greening pins to keep the boa in place simply by inserting the pins over the boas and into the Styrofoam.
4. To make the beak: Roll a glittery craft foam sheet into a cone, but don’t remove the paper backing which covers the adhesive or you’ll have a tough time unrolling it if you’re not happy with your cone shape. Trim the cone to make a level opening, which is where the beak will meet the head, and cut a nice straight line along the seam of the foam where you’ll adhere it closed. You can remove a bit of the paper backing and use the adhesive on the sheet to keep it closed, or use some hot glue to make sure it’s a strong bond and doesn’t unroll (especially in hot weather!). Poke greening pins into 4 places around at the cone’s opening and insert the pins into the stork’s head to make the beak.
5. Put a glue dot on the back on each googly eye and stick each one on to the flat part a greening pin; insert them into the stork’s head. I used excess silver glittery foam sheet pieces that I trimmed off the beak to make eyelashes and applied them to the eyes with doublestick tape.
6. Finish off your fabulous Baby Shower Stork with a feathery tiara and a white ribbon bow around his neck!
